Commands
Typer 支持在单文件中定义多个子命令(Subcommand)
A command looks the same as a CLI argument, it's just some name without a preceding
--. But commands have a predefined name, and are used to group different sets of functionalities into the same CLI application.Here I'll use CLI application or program to refer to the program you are building in Python with Typer, and command to refer to one of these "subcommands" of your program.
单命令
之前写得都是简化的模式:
import typer


def main(name: str):
    print(f"Hello {name}")


if __name__ == "__main__":
    typer.run(main)
实际上,单命令式的完整写法是这样的:
import typer

app = typer.Typer()


@app.command()
def main(name: str):
    print(f"Hello {name}")


if __name__ == "__main__":
    app()
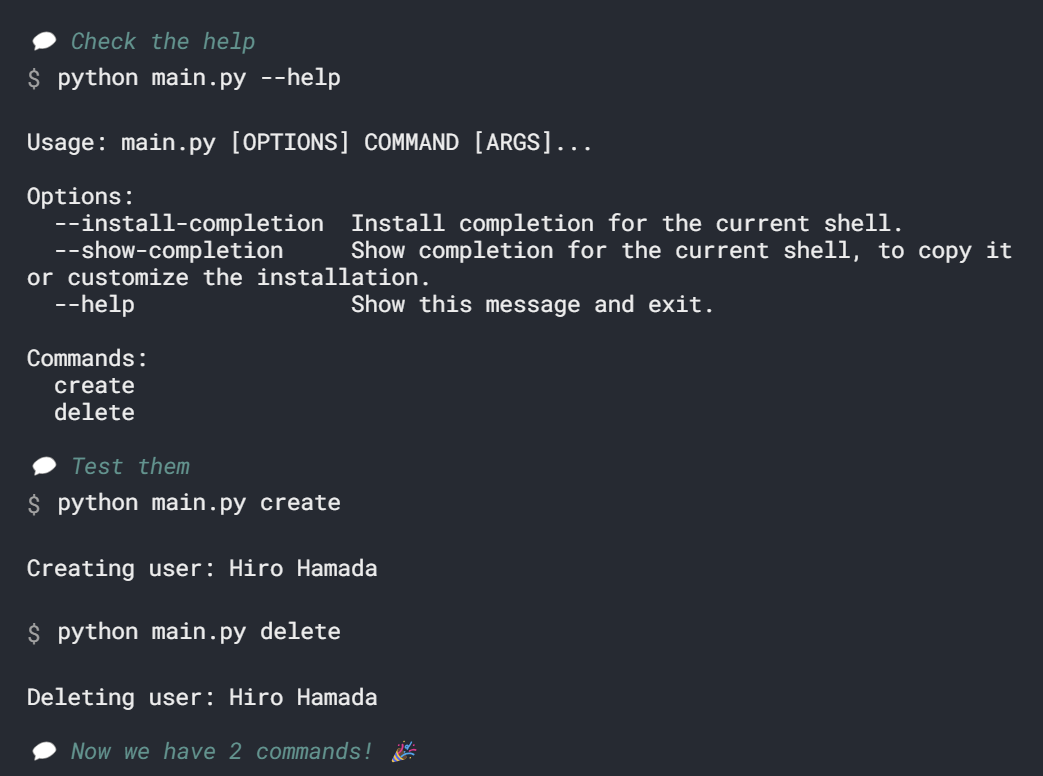
多命令
import typer

app = typer.Typer()


@app.command()
def create():
    print("Creating user: Hiro Hamada")


@app.command()
def delete():
    print("Deleting user: Hiro Hamada")


if __name__ == "__main__":
    app()
关于只定义了一个
@app.command()时 Typer 的行为,详见:https://typer.tiangolo.com/tutorial/commands/one-or-multiple/
help 说明配置
使用 no_args_is_help=True 来让命令的默认输出为 helping page:
app = typer.Typer(no_args_is_help=True)
这样,运行 python main.py 的结果也会是帮助说明页了
使用 help="Awesome CLI user manager." 来给整个 CLI application 添加说明
app = typer.Typer(help="Awesome CLI user manager.")
在 @app.command 中添加 help 参数,可以给子命令添加说明
@app.command(help="Create a new user with USERNAME.")

但是这会覆盖 docstring 的说明
将 command 设为废弃:
@app.command(deprecated=True)

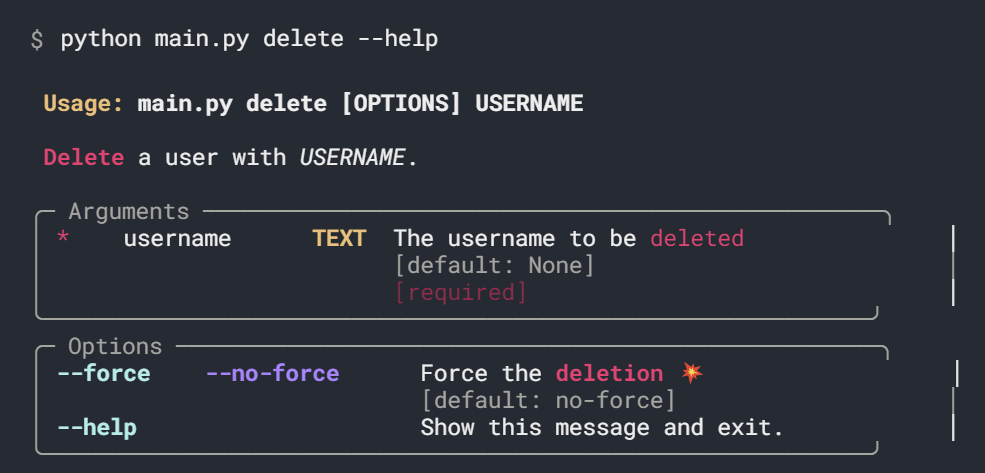
Rich Markup
欲获取 rich 的能力:
app = typer.Typer(rich_markup_mode="rich")
这样就能在各种注释说明的地方使用 rich 的标记语法啦
import typer
from typing_extensions import Annotated

app = typer.Typer(rich_markup_mode="rich")


@app.command()
def create(
    username: Annotated[
        str, typer.Argument(help="The username to be [green]created[/green]")
    ],
):
    """
    [bold green]Create[/bold green] a new [italic]shinny[/italic] user. :sparkles:

    This requires a [underline]username[/underline].
    """
    print(f"Creating user: {username}")


@app.command(help="[bold red]Delete[/bold red] a user with [italic]USERNAME[/italic].")
def delete(
    username: Annotated[
        str, typer.Argument(help="The username to be [red]deleted[/red]")
    ],
    force: Annotated[
        bool, typer.Option(help="Force the [bold red]deletion[/bold red] :boom:")
    ] = False,
):
    """
    Some internal utility function to delete.
    """
    print(f"Deleting user: {username}")


if __name__ == "__main__":
    app()

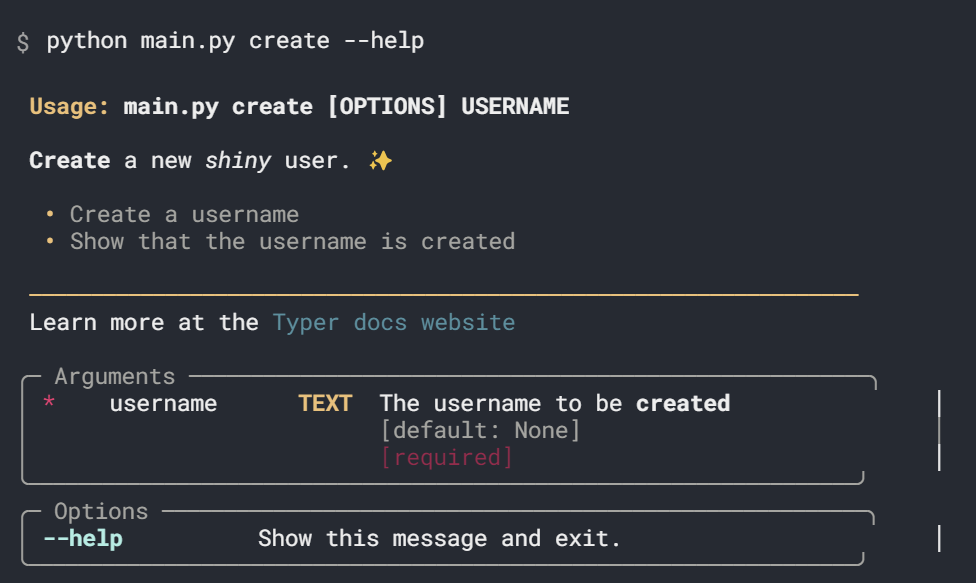
Rich Markdown
想获得 markdown 能力:
app = typer.Typer(rich_markup_mode="markdown")
例如
import typer
from typing_extensions import Annotated

app = typer.Typer(rich_markup_mode="markdown")


@app.command()
def create(
    username: Annotated[str, typer.Argument(help="The username to be **created**")],
):
    """
    **Create** a new *shinny* user. :sparkles:

    * Create a username

    * Show that the username is created

    ---

    Learn more at the [Typer docs website](https://typer.tiangolo.com)
    """
    print(f"Creating user: {username}")


@app.command(help="**Delete** a user with *USERNAME*.")
def delete(
    username: Annotated[str, typer.Argument(help="The username to be **deleted**")],
    force: Annotated[bool, typer.Option(help="Force the **deletion** :boom:")] = False,
):
    """
    Some internal utility function to delete.
    """
    print(f"Deleting user: {username}")


if __name__ == "__main__":
    app()
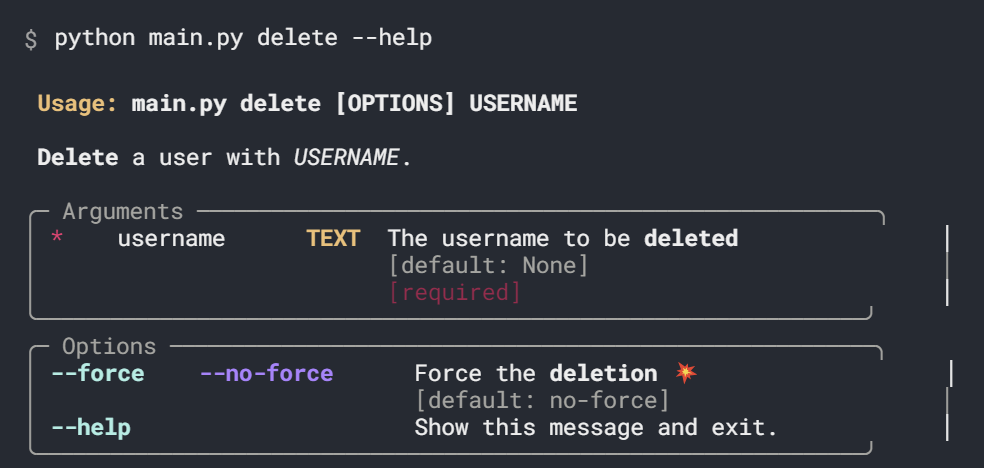
Notice that in Markdown you cannot define colors. For colors you might prefer to use Rich markup.
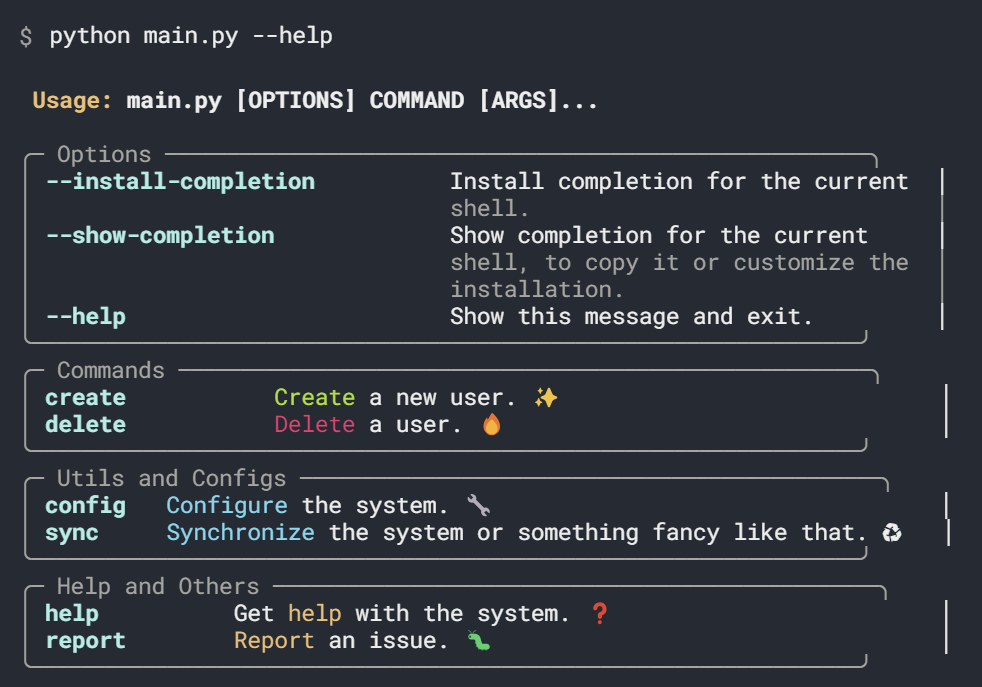
Help Panels
当然 typer 支持了子命令的 help panels:
@app.command(rich_help_panel="Utils and Configs")
没有 panel 的命令将展示在默认 panel 区,而有 panel 的命令将展示在各自的 panel 区
同样的,CLI Parameters 也支持 panel
@app.command()
def create(
    username: Annotated[str, typer.Argument(help="The username to create")],
    lastname: Annotated[
        str,
        typer.Argument(
            help="The last name of the new user", rich_help_panel="Secondary Arguments"
        ),
    ] = "",
    force: Annotated[bool, typer.Option(help="Force the creation of the user")] = False,
    age: Annotated[
        Union[int, None],
        typer.Option(help="The age of the new user", rich_help_panel="Additional Data"),
    ] = None,
    favorite_color: Annotated[
        Union[str, None],
        typer.Option(
            help="The favorite color of the new user",
            rich_help_panel="Additional Data",
        ),
    ] = None,
):
    """
    [green]Create[/green] a new user. :sparkles:
    """
    print(f"Creating user: {username}")

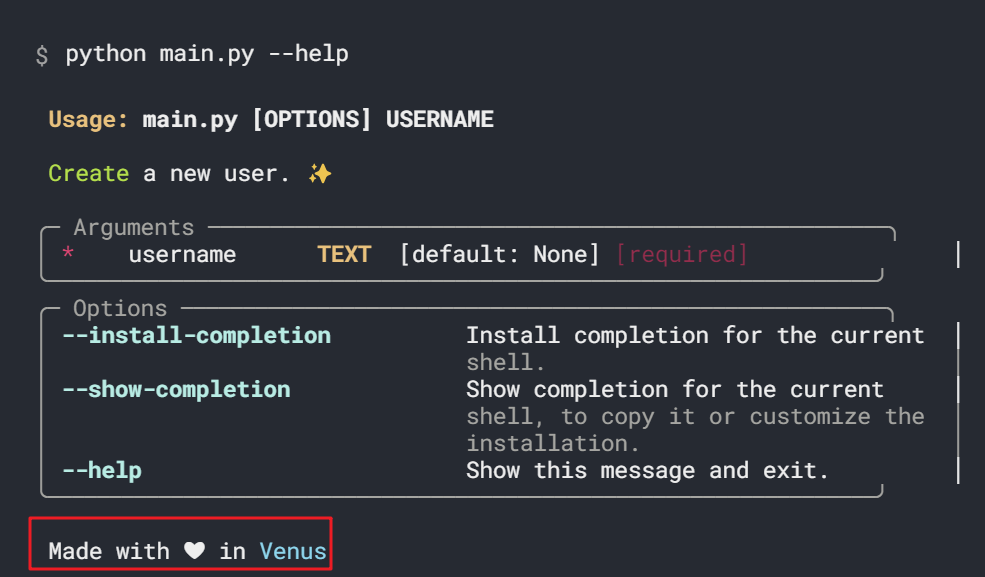
后记 Epilog
使用 epilog 参数为 CLI application 添加后记
@app.command(epilog="Made with :heart: in [blue]Venus[/blue]")
自定义命令名
默认情况下,命令名即 @app.command 修饰的函数名,不过 _ 会被转换为 -
- create_user -> create-user
当然可以自定义啦~
@app.command("create")  # the command name will be "create"
def cli_create_user(username: str):
    print(f"Creating user: {username}")
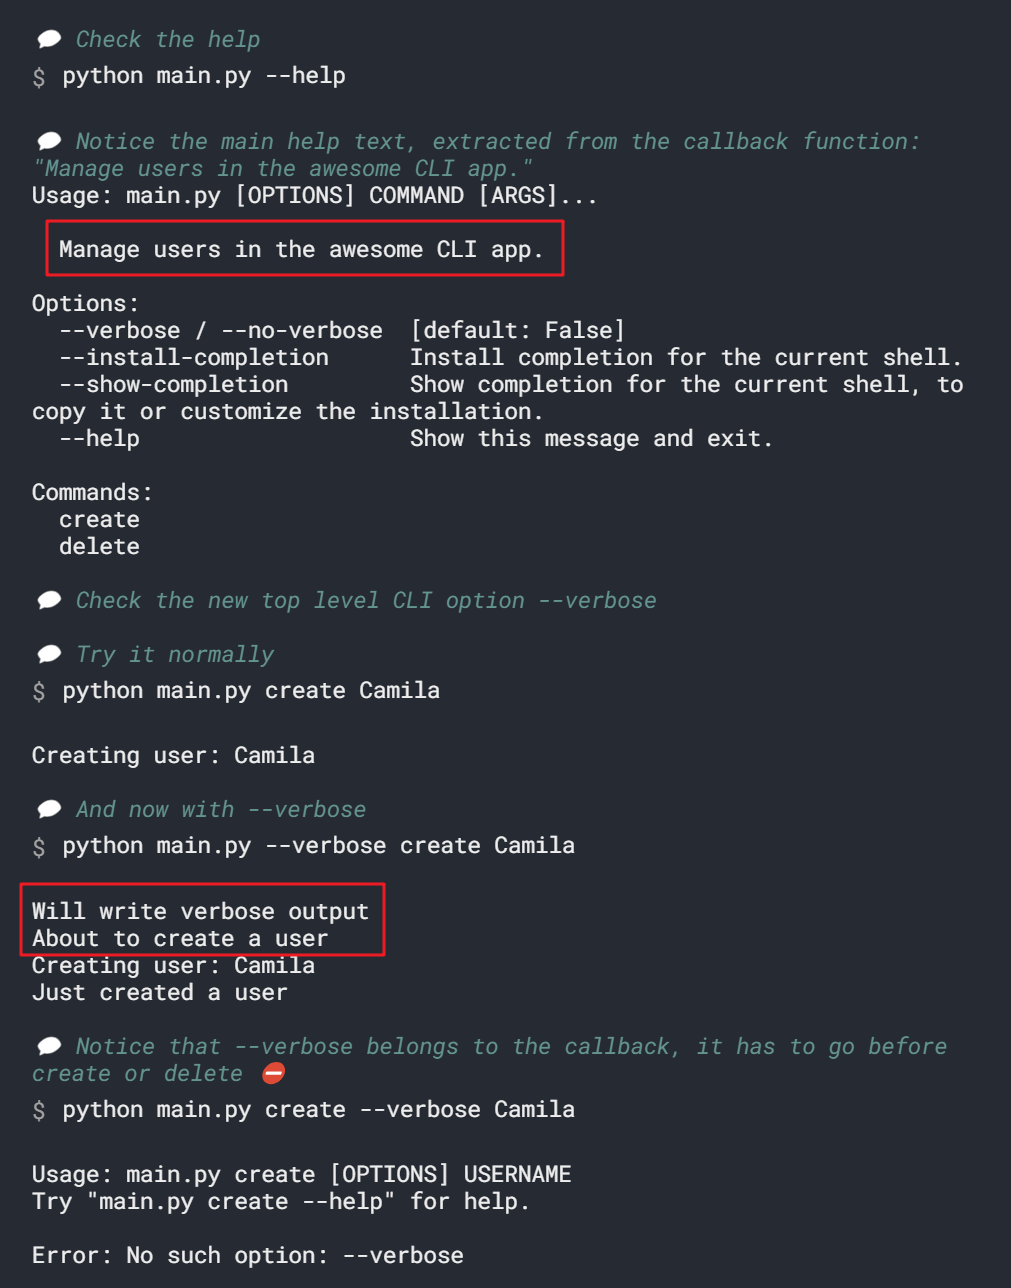
callback
可以为定义一个通用的 callback,作用于所有的子命令
import typer

app = typer.Typer()
state = {"verbose": False}


@app.command()
def create(username: str):
    if state["verbose"]:
        print("About to create a user")
    print(f"Creating user: {username}")
    if state["verbose"]:
        print("Just created a user")


@app.command()
def delete(username: str):
    if state["verbose"]:
        print("About to delete a user")
    print(f"Deleting user: {username}")
    if state["verbose"]:
        print("Just deleted a user")


@app.callback()
def main(verbose: bool = False):
    """
    Manage users in the awesome CLI app.
    """
    if verbose:
        print("Will write verbose output")
        state["verbose"] = True


if __name__ == "__main__":
    app()
相当于一个,装饰器的作用?
也可以仅仅使用 callback 来为总程序添加注释说明
@app.callback()
def callback():
    """
    Manage users CLI app.

    Use it with the create command.

    A new user with the given NAME will be created.
    """
在初始化的时候添加 callback
def callback():
    print("Running a command")


app = typer.Typer(callback=callback)
和 @app.callback() 的作用差不多,但是 @app.callback() 可以覆盖 app 的 callback
改变 callback 的运行行为
默认情况下,当没有明确给出子命令时,@app.callback() 只会负责展示帮助信息,而不会运行里面的逻辑。当然我们可以改变这一点:
@app.callback(invoke_without_command=True)
def main():
    """
    Manage users in the awesome CLI app.
    """
    print("Initializing database")

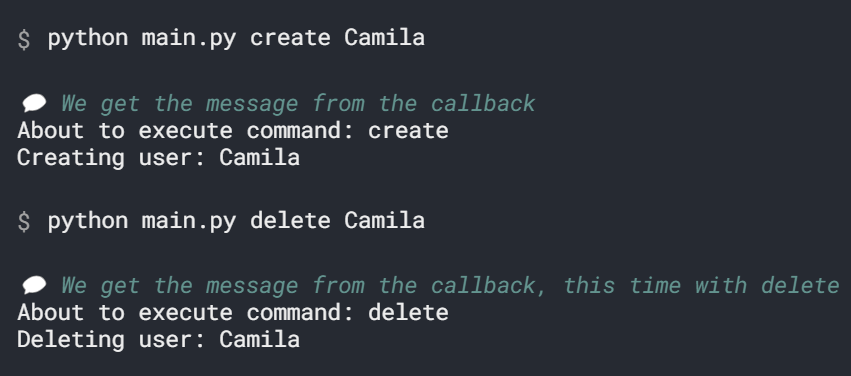
context
使用 typer.Context 来获取上下文
import typer

app = typer.Typer()


@app.command()
def create(username: str):
    print(f"Creating user: {username}")


@app.command()
def delete(username: str):
    print(f"Deleting user: {username}")


@app.callback()
def main(ctx: typer.Context):
    """
    Manage users in the awesome CLI app.
    """
    print(f"About to execute command: {ctx.invoked_subcommand}")  # the command that was invoked


if __name__ == "__main__":
    app()
可以通过 ctx.invoked_subcommand is None 来判断现在到底调用的是主程序还是子命�令:
@app.callback(invoke_without_command=True)
def main(ctx: typer.Context):
    """
    Manage users in the awesome CLI app.
    """
    if ctx.invoked_subcommand is None:
        print("Initializing database")
配置上下文
在创建子命令或 callback 时,你可以传入对 context 的相关配置,以控制某些行为
以下的例子中,我们将 allow_extra_args 和 ignore_unknown_options 都设置为 True,这样就可以接收额外的参数了
@app.command(
    context_settings={"allow_extra_args": True, "ignore_unknown_options": True}
)
def main(ctx: typer.Context):
    for extra_arg in ctx.args:
        print(f"Got extra arg: {extra_arg}")

Notice that it saves all the extra CLI parameters as a raw
listofstr, including the CLI option names and values, everything together.